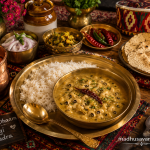
Authentic Rongi Madra Recipe | Traditional Kullu Dham Himachali Lobia Madra
Rongi Madra is a traditional Himachali Madra prepared with rongi (black-eyed peas or lobia) simmered in a rich yoghurt-based gravy flavoured with desi ghee and aromatic whole spices. This Authentic Rongi Madra Recipe is an integral part of the famous Kullu Dham, the ceremonial feast served during festivals, weddings and other auspicious occasions across the Kullu Valley of Himachal Pradesh.
Servings 4 serving
Calories 285kcal
Equipment
- UtensilPurposePressure cookerCooks the soaked rongi (black-eyed peas/lobia) until soft while retaining their shape.Heavy-bottomed kadai or deep panEnsures even cooking of the yoghurt-based gravy and helps prevent the yoghurt from sticking or scorching.WhiskBlends the yoghurt until smooth, reducing the risk of curdling during cooking.Wooden spatula or flat ladleIdeal for stirring the gravy gently and continuously while the yoghurt cooks.Measuring cups and measuring spoonsHelp maintain the correct proportion of ingredients for consistent results.Mixing bowlUseful for whisking the yoghurt and preparing the spice mixture before cooking.Small bowlConvenient for keeping the whole spices and spice powders ready before tempering.
Ingredients
- For Cooking the Rongi Black-Eyed Peas
- 1 cup dried rongi black-eyed peas/lobia, soaked overnight
- 2½ –3 cups water
- 1 small cinnamon stick
- 2 green cardamom pods
- 2 cloves
- 1 bay leaf
- Salt to taste
- For the Authentic Himachali Madra Gravy
- 2 –2½ cups thick full-fat yoghurt whisked until smooth
- 3 –4 tablespoons pure desi ghee
- 1 teaspoon cumin seeds
- 1 –2 bay leaves
- 1- inch cinnamon stick
- 2 black cardamoms lightly crushed
- 3 –4 green cardamoms lightly crushed
- 4 –5 cloves
- 8 –12 black peppercorns
- 1 small piece of mace javitri
- 1 –2 dried red chillies optional
- A pinch of asafoetida hing
- Spice Powders
- ½ teaspoon turmeric powder
- 1 –1½ teaspoons coriander powder
- ½ –¾ teaspoon Kashmiri red chilli powder
- ½ teaspoon garam masala
- ¼ teaspoon fenugreek methi powder (optional)
- Salt to taste
- Optional – For Aloo Rongi Madra
- 2 medium potatoes peeled, cut into cubes and lightly fried in desi ghee
Instructions
- Step 1: Cook the Rongi (Black-Eyed Peas)
- Drain the soaked rongi and transfer it to a pressure cooker. Add water, cinnamon, green cardamom, cloves, bay leaf and salt. Pressure cook for 3–4 whistles or until the rongi becomes tender but still retains its shape. Allow the pressure to release naturally. Reserve a little of the cooking liquid and keep the cooked rongi aside.
- Step 2: Prepare the Yoghurt
- Whisk the full-fat yoghurt until smooth and lump-free. Bring it to room temperature before cooking to minimise the risk of curdling.
- Step 3: Temper the Whole Spices
- Heat the desi ghee in a heavy-bottomed kadai over low to medium heat. Add the cumin seeds and allow them to crackle. Add the bay leaves, cinnamon, black cardamoms, green cardamoms, cloves, black peppercorns, mace and dried red chillies. Sauté for 30–40 seconds, allowing the spices to release their aroma without burning. Switch off the heat and stir in the asafoetida (hing).
- Step 4: Cook the Yoghurt Gravy
- Pour the whisked yoghurt into the kadai and immediately place it over low heat. Stir continuously with a whisk or wooden spatula until the yoghurt thickens and the ghee begins to separate around the edges. This process usually takes 10–12 minutes and forms the foundation of an authentic Himachali Rongi Madra. Continuous stirring is essential to achieve a smooth, creamy gravy.
- Step 5: Add the Spice Powders
- Once the ghee begins to separate, add the turmeric powder, coriander powder, Kashmiri red chilli powder, fenugreek (methi) powder and garam masala. Stir continuously for about 1 minute so that the spices blend evenly into the yoghurt and ghee.
- Step 6: Combine the Rongi
- Add the cooked rongi to the gravy and mix gently so that the black-eyed peas are evenly coated. If preparing Aloo Rongi Madra, add the lightly fried potato cubes at this stage. Adjust the salt and add a little reserved cooking liquid if the gravy appears too thick.
- Step 7: Simmer the Madra
- Cook the Authentic Rongi Madra over low heat for 8–10 minutes, stirring occasionally. The gravy should become rich, smooth and lightly thick, allowing the flavours of the yoghurt, spices and rongi to blend.
- Step 8: Rest and Serve
- Switch off the heat and allow the Kullu Dham Rongi Madra to rest for 5 minutes before serving. This resting time helps the gravy settle, and the flavours develop further. Serve hot with steamed rice as part of a traditional Kullu Dham meal or enjoy it with plain rice for a wholesome Himachali lunch.
Notes
Madhu Savara’s Tips and Variations for Perfect Himachali Madra
Preparing an Authentic Rongi Madra is simple, but a few traditional practices help achieve the rich texture and balanced flavour that make this Kullu Dham Rongi Madra so distinctive.Madhu Savara’s Tips
- Use fresh full-fat yoghurt at room temperature. Cold yoghurt is more likely to curdle during cooking.
- Whisk the yoghurt until smooth before adding it to the kadai.
- Cook the yoghurt over low heat and stir continuously until the ghee begins to separate. This is an important step in preparing traditional Himachali Rongi Madra.
- Use pure desi ghee for the authentic flavour and texture of this Lobia Madra Recipe.
- Cook the rongi until tender, but avoid overcooking, as the black-eyed peas should retain their shape.
- Allow the Authentic Rongi Madra to rest for a few minutes before serving so that the gravy settles naturally.
Variations
- Add lightly fried potato cubes to prepare the popular Aloo Rongi Madra, a variation enjoyed in many Himachali homes.
- For a mild touch of sweetness, add a small handful of raisins while the curry simmers.
- Adjust the quantity of dried red chillies and black peppercorns to suit your preferred level of heat without overpowering the delicate yoghurt gravy.