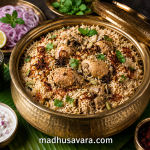
Authentic Beary Biryani Recipe | Traditional Coastal Karnataka Chicken Biryani
Beary Biryani is a traditional chicken biryani from the Beary Muslim community of Coastal Karnataka, especially around Mangaluru. Prepared with chicken, jeerakasala (kaima) rice, fresh herbs and aromatic spices, it is known for its mild, balanced flavours and fragrant aroma. Traditionally served during weddings, Eid celebrations and family gatherings, this Authentic Beary Biryani Recipe remains one of Coastal Karnataka’s most cherished festive dishes.
Servings 8 People
Calories 610kcal
Ingredients
- 1 kg chicken cut into medium-sized pieces
- 1 cup thick curd yoghurt
- 2 tbsp ginger-garlic paste
- 2 tsp Kashmiri red chilli powder
- 1 tsp turmeric powder
- 2 tsp coriander powder
- 1 tsp garam masala powder
- Salt to taste
- Juice of 1 lemon
- For Cooking the Rice
- 750 g jeerakasala kaima rice
- 3 litres water
- 2 bay leaves
- 5 green cardamoms
- 5 cloves
- 2- inch cinnamon stick
- 1 star anise
- 1 tsp whole black peppercorns
- Salt to taste
- For the Biryani Masala
- 4 large onions thinly sliced
- 4 medium tomatoes finely chopped
- 8 –10 green chillies slit
- ½ cup fresh mint leaves
- ½ cup fresh coriander leaves
- ¼ cup cooking oil
- 3 tbsp ghee
- 1 tsp fennel seeds
- ½ tsp cumin seeds
- 2 black cardamoms
- 2 blades mace
- A pinch of freshly grated nutmeg optional
- For Layering
- 1 cup fried onions
- 2 tbsp ghee
- A handful of mint leaves
- A handful of coriander leaves
- A few strands of saffron soaked in 2 tbsp warm milk optional
Instructions
- How to Make Authentic Beary Biryani (Step-by-Step)
- Making an authentic Beary Biryani Recipe is easier than it looks. The secret lies in following each step patiently without rushing the process. Good-quality ingredients, properly cooked rice and gentle dum cooking are the keys to achieving the authentic flavour and aroma.
- Step 1: Wash and Soak the Rice
- Rinse the jeerakasala (kaima) rice three to four times or until the water runs almost clear. This removes excess starch and helps the grains cook evenly without becoming sticky.
- Soak the rice in fresh water for 20 to 30 minutes. Once soaked, drain the water completely and keep the rice aside.
- Tip: If you are using basmati rice instead of jeerakasala rice, soak it for about 30 minutes, as the grains take slightly longer to absorb water.
- Step 2: Marinate the Chicken
- Wash and pat dry the chicken pieces before placing them in a large mixing bowl.
- Add the thick curd, ginger-garlic paste, Kashmiri red chilli powder, turmeric powder, coriander powder, garam masala, lemon juice and salt. Mix thoroughly so that every piece of chicken is evenly coated with the marinade.
- Cover the bowl and refrigerate for at least 1 hour. If time permits, marinate the chicken for 4 to 6 hours for deeper flavour and more tender meat.
- Why this step matters: The yoghurt gently tenderises the chicken, while the spices penetrate the meat during marination, resulting in a more flavourful biryani.
- Step 3: Prepare the Fried Onions
- Heat the oil and ghee in a heavy-bottomed pan over a medium flame.
- Add the thinly sliced onions and cook them slowly, stirring frequently, until they turn an even golden brown. Remove them immediately using a slotted spoon and spread them on a plate. They will continue to darken slightly as they cool.
- Reserve a few fried onions for garnishing and use the remaining onions while preparing the masala.
- Do not overcook the onions. Dark brown onions can make the biryani slightly bitter, while lightly golden onions add natural sweetness and depth to the masala.
- Step 4: Prepare the Beary Biryani Masala
- In the same pan, add the fennel seeds, cumin seeds, black cardamoms, cloves, cinnamon, star anise and mace. Sauté for about 30 seconds until fragrant.
- Add the slit green chillies and chopped tomatoes. Cook until the tomatoes soften and the oil begins to separate.
- Now add the marinated chicken along with the entire marinade. Mix well and cook over a medium flame for 20–25 minutes, stirring occasionally, until the chicken is almost cooked and the masala becomes thick.
- Finally, stir in the chopped mint and coriander leaves. Taste the masala and adjust the salt if required.
- Tip: The masala should be moist enough to coat the rice during dum cooking but should not be watery.
- Step 5: Cook the Rice
- Bring 3 litres of water to a rolling boil in a large pot. Add the bay leaves, green cardamoms, cloves, cinnamon, star anise, whole black peppercorns and salt.
- Add the soaked and drained jeerakasala (kaima) rice and cook over a medium-high flame until it is about 70–80% cooked. The grains should still have a slight bite in the centre.
- Drain the rice immediately using a colander and spread it gently on a large tray or plate for a few minutes. This stops the cooking process and keeps the grains separate.
- How to check: Press a grain of rice gently between your fingers. It should break easily but still have a tiny firm centre.
- Step 6: Layer the Biryani
- Keep the chicken masala in the heavy-bottomed biryani pot. If you prepared it in another pan, transfer it now.
- Spread half of the partially cooked rice evenly over the chicken masala without pressing it down.
- Sprinkle some fried onions, chopped mint, chopped coriander and a little ghee over the rice.
- Add the remaining rice and finish with the rest of the fried onions, mint, coriander and ghee. If using saffron milk, drizzle it evenly over the top layer.
- Tip: Avoid mixing the rice and masala at this stage. Separate layers give the biryani its beautiful appearance and allow the flavours to blend gradually during dum cooking.
- Step 7: Dum Cooking
- Cover the pot with a tight-fitting lid. If the lid is loose, seal the edges with wheat flour dough or aluminium foil to prevent the steam from escaping.
- Cook on a low flame for 25–30 minutes. If your pan has a thin base, place a heavy tawa underneath to prevent the bottom layer from burning.
- Switch off the heat and allow the biryani to rest for 10–15 minutes without opening the lid. This resting time allows the steam to settle and the flavours to develop fully.
- Do not lift the lid during dum cooking. Opening the pot releases the trapped steam and affects both the texture and aroma of the biryani.
- Step 8: Serve the Beary Biryani
- Open the lid gently and fluff the rice with a long fork or a flat spoon, lifting it from the sides without breaking the grains.
- Serve the Authentic Beary Biryani hot with onion raita, salan, pickle, boiled eggs or papad. Garnish with extra fried onions, fresh coriander and mint leaves, if desired.
- Every spoonful should have a little rice, chicken and masala, giving you the authentic flavour and aroma that make this traditional Beary Biryani Recipe so special.
Notes
Tips and Variations
Madhu Savara’s Tips
After preparing this Authentic Beary Biryani Recipe a few times and studying the traditional method, here are a few tips that will help you get the best results every time.- Use jeerakasala (kaima) rice whenever possible. It gives the biryani its authentic aroma and texture.
- Don’t skip the marination. Marinating the chicken for at least an hour keeps it juicy and flavourful.
- Cook the rice only up to 70–80%. The remaining cooking happens during dum. Fully cooked rice may become mushy.
- Fry the onions patiently. Evenly golden onions add sweetness and depth to the masala. Avoid over-browning them.
- Keep the masala thick, not watery. Excess liquid can make the rice sticky during dum cooking.
- Seal the pot properly. Trapped steam is essential for developing the aroma and flavour.
- Rest the biryani before serving. Let it stand for 10–15 minutes after dum. This helps the rice absorb the remaining moisture and makes serving easier.
- Fluff, don’t stir. Use a flat spoon to lift the rice gently from the sides so the grains remain separate.