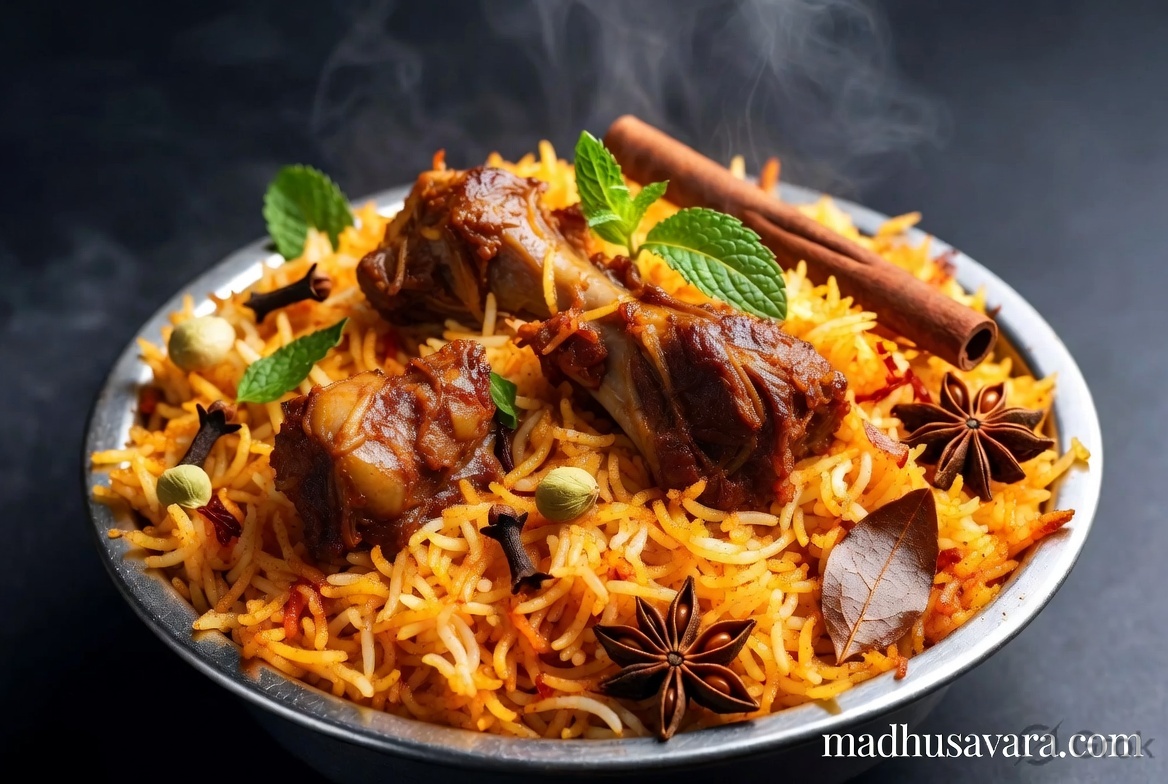

Authentic Kalyani Biryani Recipe | Traditional Hyderabadi Deccani Mutton Biryani
Authentic Kalyani Mutton Biryani in a metal bowl, featuring tender mutton pieces, saffron rice, and aromatic spices - steaming hot and vibrant

Author’s Note

The Authentic Kalyani Biryani Recipe represents a distinctive chapter in Hyderabad’s rich biryani tradition. Although it is often mentioned alongside Hyderabadi Dum Biryani, its flavour, preparation and identity are entirely different. A rich tomato-based masala, fresh mint, coriander, green chillies and tender mutton are the defining characteristics of this traditional Deccani biryani, giving it a bold yet beautifully balanced taste.

Over the years, I have learnt that the authenticity of a regional recipe lies not in adding more ingredients but in respecting the ingredients and cooking method that have defined it for generations. That is the approach I have followed while presenting this Kalyani Biryani Recipe. The spice balance, slow-cooked mutton, fragrant basmati rice and dum cooking remain true to the traditional style, allowing the natural flavours to stand out without unnecessary additions.

At madhusavara.com, my purpose is to document authentic regional recipes that deserve to be remembered and cooked in our homes. This Authentic Kalyani Biryani Recipe has been written with that same commitment, preserving its original Deccani character so that you can enjoy one of Hyderabad’s most celebrated traditional biryanis with confidence.

Madhu Savara

Author and owner of madhusavara.com

What is Kalyani Biryani?

Not every famous biryani comes from a royal kitchen. Some become favourites because families continue to cook them the same way for generations. Authentic Kalyani Biryani is one such traditional recipe from Hyderabad. Prepared with tender mutton, fragrant basmati rice, fresh tomatoes, mint, coriander and everyday Indian spices, it is known for its rich masala, beautiful aroma and satisfying flavour.

Unlike many other biryanis where the rice takes centre stage, the heart of a Traditional Kalyani Biryani Recipe is its well-cooked mutton masala. The meat is gently cooked with tomatoes, herbs and spices until tender, then layered with partially cooked basmati rice and finished on dum. As the biryani cooks, the rice slowly absorbs the flavours of the masala, creating a dish where every spoonful carries the taste and aroma of authentic Deccani cooking.

Simple ingredients, careful cooking and patience have kept Kalyani Biryani close to its roots. Even today, it remains one of Hyderabad’s most-loved regional biryanis, enjoyed for its honest flavours rather than its rich garnishes or elaborate presentation.

Why You Will Love This Authentic Kalyani Biryani

Every regional biryani has its own identity, and that is exactly what makes Authentic Kalyani Biryani so memorable. It is rich without being heavy, aromatic without being overpowering and beautifully balanced from the first spoonful to the last.

You will enjoy this recipe because:

  • It follows the traditional Deccani method of preparing Kalyani Biryani.
  • Tender mutton is cooked in a rich tomato-based masala before the dum, giving every grain of rice a deep, satisfying flavour.
  • Fresh mint, coriander and whole spices add aroma without masking the taste of the meat.
  • The rice remains light, fluffy and separate while absorbing the flavours of the masala.
  • It is equally suitable for a family Sunday lunch, festive celebrations or a special dinner with guests.
  • It pairs naturally with onion raita, Mirchi ka Salan and fresh lemon wedges.

Kalyani Biryani vs Other Famous Indian Biryanis

Every region in India has its own style of preparing biryani, shaped by local ingredients, cooking traditions and family recipes. While all of them are delicious, Authentic Kalyani Biryani stands out for its rich tomato-based mutton masala and distinctive Deccani flavour.

Feature Kalyani Biryani Hyderabadi Dum Biryani Lucknowi (Awadhi) Biryani Kolkata Biryani Malabar Biryani
Place of Origin Hyderabad, Telangana Hyderabad, Telangana Lucknow, Uttar Pradesh Kolkata, West Bengal Kerala
Main Meat Mutton Mutton or Chicken Mutton Mutton Chicken or Mutton
Rice Used Aged Basmati Rice Aged Basmati Rice Aged Basmati Rice Aged Basmati Rice Jeerakasala Rice
Signature Masala Tomato-based Deccani Masala Yoghurt & Whole Spice Marinade Mild Yakhni Masala Light Aromatic Masala Kerala Spice Blend
Cooking Method Mutton cooked first, then layered on dum Kacchi or Pakki Dum Yakhni with Dum Layered Dum Layered Dum
Spice Level Medium to Hot Medium Mild Mild Medium
Distinctive Feature Rich tomato flavour with fresh herbs Delicate royal flavour with saffron Fragrant and subtle Potato and boiled egg Ghee and Kerala spices
Traditional Accompaniments Mirchi ka Salan, Onion Raita Salan, Raita Burani Raita Salad, Raita Pickle, Raita

What makes Authentic Kalyani Biryani special?

Among India’s regional biryanis, Authentic Kalyani Biryani is recognised for its hearty tomato-based masala, tender mutton and generous use of fresh mint and coriander. Unlike the delicate Awadhi style or the saffron-rich Hyderabadi Dum Biryani, this traditional Deccani recipe develops its flavour from a slow-cooked mutton masala that gently seasons every grain of rice during dum. The result is a biryani that is robust, comforting and deeply satisfying without relying on rich ingredients or elaborate garnishes.


Table of Contents

  • Madhu Savara’s Note
  • What is Kalyani Biryani?
  • Why You’ll Love This Recipe
  • Kalyani Biryani vs Other Biryanis
  • Origin and History
  • Recipe Information
  • Ingredients
  • Equipment Required
  • Nutritional Information
  • Step-by-Step Recipe
  • Madhu Savara’s Tips
  • Variations
  • Common Mistakes to Avoid
  • Storage and Reheating
  • Frequently Asked Questions
  • Final Thoughts
  • About Madhu Savara

Servings

8 People

Preparation Time:

30 Minutes, Marination Time: 2 Hours, Dum Time: 20 Minutes

Cooking Time:

1 Hour

Calories

480

Ingredients

For Marinating the Mutton

  • 1 kg mutton (goat meat), bone-in, cut into medium-sized pieces
  • 250 g thick fresh curd (dahi)
  • 3 tbsp fresh ginger-garlic paste
  • 2 tsp Kashmiri red chilli powder
  • 1 tsp hot red chilli powder (adjust to taste)
  • 1 tsp turmeric powder
  • 2 tsp coriander powder
  • 1 tsp cumin powder
  • 2 tsp freshly ground garam masala
  • Juice of 1 lime
  • 1½ tsp salt

For the Kalyani Masala

  • 1 cup cooking oil
  • 4 medium onions, thinly sliced
  • 3 large ripe tomatoes, finely chopped
  • 5 green chillies, slit lengthwise
  • 1 cup fresh mint leaves
  • 1 cup fresh coriander leaves, chopped

For Cooking the Rice

  • 1 kg aged long-grain basmati rice
  • 4 litres water
  • 1 tsp shahi jeera
  • 4 green cardamoms
  • 5 cloves
  • 1 large bay leaf
  • 2-inch cinnamon stick
  • 3 tbsp salt

For Layering

  • 1 cup fried onions (birista)
  • ¼ cup chopped mint leaves
  • ¼ cup chopped coriander leaves
  • 2 tbsp pure desi ghee
  • A generous pinch of saffron soaked in 2 tbsp warm milk

Equipment Needed

The right cookware makes preparing Authentic Kalyani Biryani easier and helps achieve the traditional texture and flavour.

Equipment Purpose
Heavy-Bottomed Handi or Degchi with a Tight-Fitting Lid Essential for layering the biryani and slow dum cooking without burning the bottom.
Pressure Cooker or Heavy-Bottomed Cooking Pot Used to cook the mutton until tender while developing a rich, flavourful masala.
Large Cooking Pot For boiling basmati rice with whole spices until it is 75–80% cooked.
Colander or Large Strainer Drains the rice quickly to prevent overcooking.
Flat Iron Tawa Placed beneath the handi during dum to distribute heat evenly and prevent scorching.
Large Mixing Bowl For marinating the mutton thoroughly with spices and curd.
Sharp Knife and Chopping Board For slicing onions, chopping tomatoes and preparing fresh herbs.
Wooden Spatula or Rice Spoon Helps mix and serve the biryani gently without breaking the rice grains.
Measuring Cups and Spoons Ensure accurate quantities for a well-balanced spice blend.

Nutrition Information

(Approximate Per Serving)

The following nutritional values are approximate and may vary depending on the quality of the ingredients, quantity of oil and size of the serving.

Nutrient Approximate Value % Daily Value*
Energy 480 kcal 24%
Protein 28 g 56%
Carbohydrates 55 g 18%
Total Fat 16 g 25%
Saturated Fat 5 g 25%
Dietary Fibre 3 g 11%
Sodium 810 mg 34%

* Per cent Daily Values are based on a 2,000-calorie diet. Individual nutritional requirements may vary according to age, activity level and dietary needs.

Step by Step Instructions

Step 1: Marinate the Mutton

Building the foundation of flavour

Wash the mutton thoroughly and drain away all excess water. Place it in a large mixing bowl and add the curd, ginger-garlic paste, Kashmiri red chilli powder, hot red chilli powder, turmeric, coriander powder, cumin powder, garam masala, lime juice and salt. Mix well with your hands so that the marinade coats every piece of mutton evenly.

Cover the bowl and refrigerate for at least 2 hours. For a richer flavour and more tender meat, marinate overnight if time permits.

Observation: By the end of marination, every piece of mutton should be evenly coated with the masala and ready to absorb the flavours during cooking.

Step 2: Prepare the Birista

Creating the aromatic base

Heat the oil in a pressure cooker or heavy-bottomed pan over medium heat. Add the thinly sliced onions and fry, stirring frequently, until they turn evenly golden brown. Traditionally known as birista, these crisp fried onions add sweetness, aroma and depth to the biryani.

Remove about half of the birista with a slotted spoon and spread it on a plate to cool. Reserve it for assembling the biryani later.

Observation: The onions should be evenly golden brown and crisp after cooling, not dark brown or burnt.

Step 3: Prepare the Signature Kalyani Masala

The heart of this traditional biryani

Using the same oil, add the chopped tomatoes and slit green chillies. Cook over medium heat until the tomatoes soften completely and blend with the onions to form a thick masala. Stir in half of the chopped mint and coriander leaves and continue cooking until the herbs wilt and the masala becomes fragrant.

Observation: The masala should look rich and glossy, with the oil beginning to separate naturally around the edges.

Step 4: Cook the Mutton

Slow cooking for tender, flavourful meat

Add the marinated mutton to the prepared masala and cook over medium-high heat for 8–10 minutes, stirring occasionally until the meat is well coated and the raw aroma disappears. Pour in 1 cup of warm water, cover the cooker and cook for 4–5 whistles, or until the mutton becomes tender while still holding its shape.

Allow the pressure to release naturally before opening the lid.

Observation: The gravy should be thick enough to coat the meat without becoming dry or watery.

Step 5: Parboil the Rice

Preparing the rice for dum

Bring 4 litres of water to a rolling boil. Add the salt, shahi jeera, green cardamom, cloves, cinnamon and bay leaf. Add the soaked basmati rice and cook until it is about 75–80% done, then drain immediately in a colander.

Observation: The rice grains should be long, separate and slightly firm in the centre, as they will finish cooking during the dum.

Step 6: Assemble the Biryani

Building the layers for dum

Transfer the cooked mutton along with its masala into a heavy-bottomed handi and spread it evenly. Cover it with half of the partially cooked rice, followed by a layer of birista, chopped mint and coriander. Add the remaining rice and finish with the remaining birista, herbs, saffron milk and desi ghee.

Observation: Distribute the herbs, birista and saffron milk evenly so that every portion carries the same aroma and flavour.

Step 7: Traditional Dum Cooking

Bringing all the flavours together

Cover the handi with a tight-fitting lid and seal the edges with wheat dough if required. Place it over a preheated tawa, reduce the heat to low and cook on dum for 20 minutes. Switch off the heat and allow the biryani to rest undisturbed for 10 minutes before opening the lid.

Gently lift the rice from the sides with a flat rice spoon, bringing the mutton and masala together without breaking the grains. Serve hot with onion raita, Mirchi ka Salan and fresh lemon wedges.

Tips and Variations

Madhu Savara’s Tips

Tip Why It Matters
Choose aged basmati rice Produces long, fluffy grains that remain separate after dum.
Use fresh ginger-garlic paste Gives the biryani a cleaner, fresher flavour than ready-made paste.
Prefer thick, fresh curd Balances the spices without making the masala overly sour.
Fry the birista patiently Evenly golden onions add colour, sweetness and depth of flavour.
Keep the mutton masala thick Prevents the rice from becoming soggy during dum.
Do not open the handi during dum. Traps the steam and allows the rice to absorb the full flavour of the masala.
Rest before serving Let the biryani stand for 10 minutes so the flavours settle and the rice remains intact while serving.

Variations

Variation Simple Change
Kalyani Chicken Biryani Replace mutton with 1 kg bone-in chicken. Cook the chicken directly in the masala and reduce the cooking time.
Spicier Version Increase the green chillies or hot red chilli powder to suit your taste.
Festive Version Add a few strands of saffron soaked in warm milk and an extra spoon of desi ghee before dum for a richer aroma.

Serving Suggestions

Kalyani Biryani is traditionally served with simple accompaniments that complement its rich Deccani flavours.

  • Onion Raita
  • Mirchi ka Salan
  • Fresh lemon wedges
  • Sliced onions
  • Cucumber salad
  • Chilled chaas or sweet lassi during summer

Allergen Information

Allergen Information

Before preparing this recipe, please check the ingredients carefully if you or anyone in your family has food allergies.

Ingredient Allergen Information
Curd (Dahi) Contains Milk (Dairy).
Desi Ghee Contains Milk (Dairy).
Whole Spices (Cardamom, Cloves, Cinnamon, Bay Leaf, Shahi Jeera) May cause allergic reactions in individuals sensitive to spices.
Red Chilli Powder & Green Chillies May not be suitable for people sensitive to chillies or spicy foods.
Fresh Coriander & Mint Rarely, fresh herbs may trigger allergies in sensitive individuals.
Lime Juice Citrus allergies are uncommon but possible in susceptible individuals.

This recipe does not contain: Eggs, peanuts, tree nuts, soy, wheat, fish, shellfish or sesame as part of the traditional ingredients. However, always check packaged spices and other ingredients for possible cross-contamination if preparing the recipe for someone with severe food allergies.

Other Essentials

Common Mistakes to Avoid

A few small mistakes can affect the texture and flavour of your biryani. Keeping these points in mind will help you achieve the best results every time.

Mistake What to Do Instead
Overcooking the rice Cook the basmati rice only until 75–80% done so it finishes cooking perfectly during dum.
Using thin or sour curd Use thick, fresh curd to prepare a rich and well-balanced masala.
Layering undercooked mutton Ensure the mutton is tender before layering, as it cooks very little during dum.
Preparing a watery masala The masala should coat the mutton well without excess liquid.
Cooking on high heat during dum Keep the heat low and place the handi over a tawa for gentle, even cooking.
Opening the handi too soon Let the biryani rest for 10 minutes after dum so the flavours settle naturally.

Storage & Reheating

Storage Reheating
Allow the biryani to cool completely before storing. Transfer it to an airtight container and refrigerate for up to 3 days. For longer storage, freeze in portion-sized containers for up to 1 month. Reheat in a heavy-bottomed pan over low heat after sprinkling 1–2 tablespoons of water. Cover with a lid and warm gently until heated through. Avoid reheating repeatedly, as it may dry the rice and affect the texture.

Frequently Asked Questions

What makes Kalyani Biryani different from Hyderabadi Dum Biryani?

Kalyani Biryani is known for its rich tomato-based mutton masala and bold Deccani flavours, whereas Hyderabadi Dum Biryani is milder and relies more on yoghurt, whole spices and the traditional dum method for its aroma.

Which rice is best for Kalyani Biryani?

Aged long-grain basmati rice is the preferred choice because it cooks into long, separate grains and absorbs the masala beautifully during dum.

Can I prepare Kalyani Biryani in advance?

Yes. The mutton masala can be prepared a day ahead and refrigerated. Assemble the layers and complete the dum cooking just before serving for the freshest flavour and aroma.

Why did my biryani turn dry?

A dry biryani is usually the result of overcooking the masala or leaving too little moisture before layering. The masala should remain thick and coat the mutton without becoming dry.

Can I freeze leftover biryani?

Yes. Once completely cooled, store it in freezer-safe containers for up to one month. Thaw overnight in the refrigerator before reheating gently.

What should I serve with Kalyani Biryani?

Onion raita, Mirchi ka Salan, sliced onions, fresh lemon wedges and a simple cucumber salad are traditional accompaniments that complement its rich Deccani flavours.

A Final Word from Madhu Savara

Kalyani Biryani is one of those traditional recipes that shows how simple ingredients, balanced spices and patient cooking can create a truly satisfying meal. The rich tomato masala, tender mutton and fragrant basmati rice give this biryani its own distinct identity and make it a favourite in many Hyderabadi homes.

If you prepare this Authentic Kalyani Biryani Recipe, I hope you enjoy making it as much as serving it. Every home has its own way of cooking, and that is what makes traditional recipes so special. If your family prepares Kalyani Biryani differently, do share your experience in the comments. I always enjoy learning how the same recipe is cooked in different homes.

From My Kitchen

Cooking has always been an important part of my home. The recipes I share on madhusavara.com are prepared in my own kitchen, using ingredients that are easily available and methods that stay close to the traditional recipe. I hope you enjoy preparing them at home.

Disclaimer

Important Notice: Read Before Proceeding

The recipes, preparation methods, nutritional details, and related content published on Madhu Savara’s website, social media, and associated platforms are intended solely for general informational and educational purposes. While every effort has been made to ensure accuracy and reliability, we make no guarantees regarding the results, safety, or accuracy of any recipe presented here.

We are not licensed nutritionists, dieticians, or medical professionals. The nutritional values provided are estimates only, calculated using third-party tools, and should not be used for medical diagnosis, dietary treatment, or allergy management. If you have any medical conditions, dietary restrictions, or food allergies, please consult your doctor or certified dietitian before attempting any recipe.

Cooking inherently involves sharp tools, high heat, and the risk of injury or fire. You assume full responsibility for your kitchen practices. Madhu Savara, the website, and all contributors shall not be held liable for any damage, injury, loss, or adverse outcome resulting directly or indirectly from the preparation, consumption, or interpretation of any content herein.

By using this website and attempting any recipe, you agree to hold harmless and indemnify Madhu Savara and her team from any liability, legal claim, or damages arising from the use of this content. You are encouraged to exercise independent judgment and take full responsibility for your health, kitchen safety, and actions.


Authentic Kalyani Mutton Biryani in a metal bowl, featuring tender mutton pieces, saffron rice, and aromatic spices - steaming hot and vibrant
Print

Authentic Kalyani Biryani Recipe | Traditional Hyderabadi Deccani Mutton Biryani

Not every famous biryani comes from a royal kitchen. Some become favourites because families continue to cook them the same way for generations. Authentic Kalyani Biryani is one such traditional recipe from Hyderabad. Prepared with tender mutton, fragrant basmati rice, fresh tomatoes, mint, coriander and everyday Indian spices, it is known for its rich masala, beautiful aroma and satisfying flavour.
Unlike many other biryanis where the rice takes centre stage, the heart of a Traditional Kalyani Biryani Recipe is its well-cooked mutton masala. The meat is gently cooked with tomatoes, herbs and spices until tender, then layered with partially cooked basmati rice and finished on dum. As the biryani cooks, the rice slowly absorbs the flavours of the masala, creating a dish where every spoonful carries the taste and aroma of authentic Deccani cooking.
Prep Time 30 minutes
Cook Time 1 hour
Marination time and Dum Time 1 day 2 hours 20 minutes
Total Time 1 day 3 hours 50 minutes
Servings 8 People
Calories 480kcal
Author Madhu Savara

Equipment

  • EquipmentPurposeHeavy-Bottomed Handi or Degchi with a Tight-Fitting LidEssential for layering the biryani and slow dum cooking without burning the bottom.Pressure Cooker or Heavy-Bottomed Cooking PotUsed to cook the mutton until tender while developing a rich, flavourful masala.Large Cooking PotFor boiling basmati rice with whole spices until it is 75–80% cooked.Colander or Large StrainerDrains the rice quickly to prevent overcooking.Flat Iron TawaPlaced beneath the handi during dum to distribute heat evenly and prevent scorching.Large Mixing BowlFor marinating the mutton thoroughly with spices and curd.Sharp Knife and Chopping BoardFor slicing onions, chopping tomatoes and preparing fresh herbs.Wooden Spatula or Rice SpoonHelps mix and serve the biryani gently without breaking the rice grains.Measuring Cups and SpoonsEnsure accurate quantities for a well-balanced spice blend.

Ingredients

  • For Marinating the Mutton
  • 1 kg mutton goat meat, bone-in, cut into medium-sized pieces
  • 250 g thick fresh curd dahi
  • 3 tbsp fresh ginger-garlic paste
  • 2 tsp Kashmiri red chilli powder
  • 1 tsp hot red chilli powder adjust to taste
  • 1 tsp turmeric powder
  • 2 tsp coriander powder
  • 1 tsp cumin powder
  • 2 tsp freshly ground garam masala
  • Juice of 1 lime
  • tsp salt
  • For the Kalyani Masala
  • 1 cup cooking oil
  • 4 medium onions thinly sliced
  • 3 large ripe tomatoes finely chopped
  • 5 green chillies slit lengthwise
  • 1 cup fresh mint leaves
  • 1 cup fresh coriander leaves chopped
  • For Cooking the Rice
  • 1 kg aged long-grain basmati rice
  • 4 litres water
  • 1 tsp shahi jeera
  • 4 green cardamoms
  • 5 cloves
  • 1 large bay leaf
  • 2- inch cinnamon stick
  • 3 tbsp salt
  • For Layering
  • 1 cup fried onions birista
  • ¼ cup chopped mint leaves
  • ¼ cup chopped coriander leaves
  • 2 tbsp pure desi ghee
  • A generous pinch of saffron soaked in 2 tbsp warm milk

Instructions

  • Step 1: Marinate the Mutton
  • Building the foundation of flavour
  • Wash the mutton thoroughly and drain away all excess water. Place it in a large mixing bowl and add the curd, ginger-garlic paste, Kashmiri red chilli powder, hot red chilli powder, turmeric, coriander powder, cumin powder, garam masala, lime juice and salt. Mix well with your hands so that the marinade coats every piece of mutton evenly.
  • Cover the bowl and refrigerate for at least 2 hours. For a richer flavour and more tender meat, marinate overnight if time permits.
  • Observation: By the end of marination, every piece of mutton should be evenly coated with the masala and ready to absorb the flavours during cooking.
  • Step 2: Prepare the Birista
  • Creating the aromatic base
  • Heat the oil in a pressure cooker or heavy-bottomed pan over medium heat. Add the thinly sliced onions and fry, stirring frequently, until they turn evenly golden brown. Traditionally known as birista, these crisp fried onions add sweetness, aroma and depth to the biryani.
  • Remove about half of the birista with a slotted spoon and spread it on a plate to cool. Reserve it for assembling the biryani later.
  • Observation: The onions should be evenly golden brown and crisp after cooling, not dark brown or burnt.
  • Step 3: Prepare the Signature Kalyani Masala
  • The heart of this traditional biryani
  • Using the same oil, add the chopped tomatoes and slit green chillies. Cook over medium heat until the tomatoes soften completely and blend with the onions to form a thick masala. Stir in half of the chopped mint and coriander leaves and continue cooking until the herbs wilt and the masala becomes fragrant.
  • Observation: The masala should look rich and glossy, with the oil beginning to separate naturally around the edges.
  • Step 4: Cook the Mutton
  • Slow cooking for tender, flavourful meat
  • Add the marinated mutton to the prepared masala and cook over medium-high heat for 8–10 minutes, stirring occasionally until the meat is well coated and the raw aroma disappears. Pour in 1 cup of warm water, cover the cooker and cook for 4–5 whistles, or until the mutton becomes tender while still holding its shape.
  • Allow the pressure to release naturally before opening the lid.
  • Observation: The gravy should be thick enough to coat the meat without becoming dry or watery.
  • Step 5: Parboil the Rice
  • Preparing the rice for dum
  • Bring 4 litres of water to a rolling boil. Add the salt, shahi jeera, green cardamom, cloves, cinnamon and bay leaf. Add the soaked basmati rice and cook until it is about 75–80% done, then drain immediately in a colander.
  • Observation: The rice grains should be long, separate and slightly firm in the centre, as they will finish cooking during the dum.
  • Step 6: Assemble the Biryani
  • Building the layers for dum
  • Transfer the cooked mutton along with its masala into a heavy-bottomed handi and spread it evenly. Cover it with half of the partially cooked rice, followed by a layer of birista, chopped mint and coriander. Add the remaining rice and finish with the remaining birista, herbs, saffron milk and desi ghee.
  • Observation: Distribute the herbs, birista and saffron milk evenly so that every portion carries the same aroma and flavour.
  • Step 7: Traditional Dum Cooking
  • Bringing all the flavours together
  • Cover the handi with a tight-fitting lid and seal the edges with wheat dough if required. Place it over a preheated tawa, reduce the heat to low and cook on dum for 20 minutes. Switch off the heat and allow the biryani to rest undisturbed for 10 minutes before opening the lid.
  • Gently lift the rice from the sides with a flat rice spoon, bringing the mutton and masala together without breaking the grains. Serve hot with onion raita, Mirchi ka Salan and fresh lemon wedges.

Notes

Madhu Savara’s Tips

Tip Why It Matters
Choose aged basmati rice Produces long, fluffy grains that remain separate after dum.
Use fresh ginger-garlic paste Gives the biryani a cleaner, fresher flavour than ready-made paste.
Prefer thick, fresh curd Balances the spices without making the masala overly sour.
Fry the birista patiently Evenly golden onions add colour, sweetness and depth of flavour.
Keep the mutton masala thick Prevents the rice from becoming soggy during dum.
Do not open the handi during dum. Traps the steam and allows the rice to absorb the full flavour of the masala.
Rest before serving Let the biryani stand for 10 minutes so the flavours settle and the rice remains intact while serving.

Variations

Variation Simple Change
Kalyani Chicken Biryani Replace mutton with 1 kg bone-in chicken. Cook the chicken directly in the masala and reduce the cooking time.
Spicier Version Increase the green chillies or hot red chilli powder to suit your taste.
Festive Version Add a few strands of saffron soaked in warm milk and an extra spoon of desi ghee before dum for a richer aroma.

Serving Suggestions

Kalyani Biryani is traditionally served with simple accompaniments that complement its rich Deccani flavours.
  • Onion Raita
  • Mirchi ka Salan
  • Fresh lemon wedges
  • Sliced onions
  • Cucumber salad
  • Chilled chaas or sweet lassi during summer