Authentic Beary Biryani Recipe | Traditional Coastal Karnataka Chicken Biryani
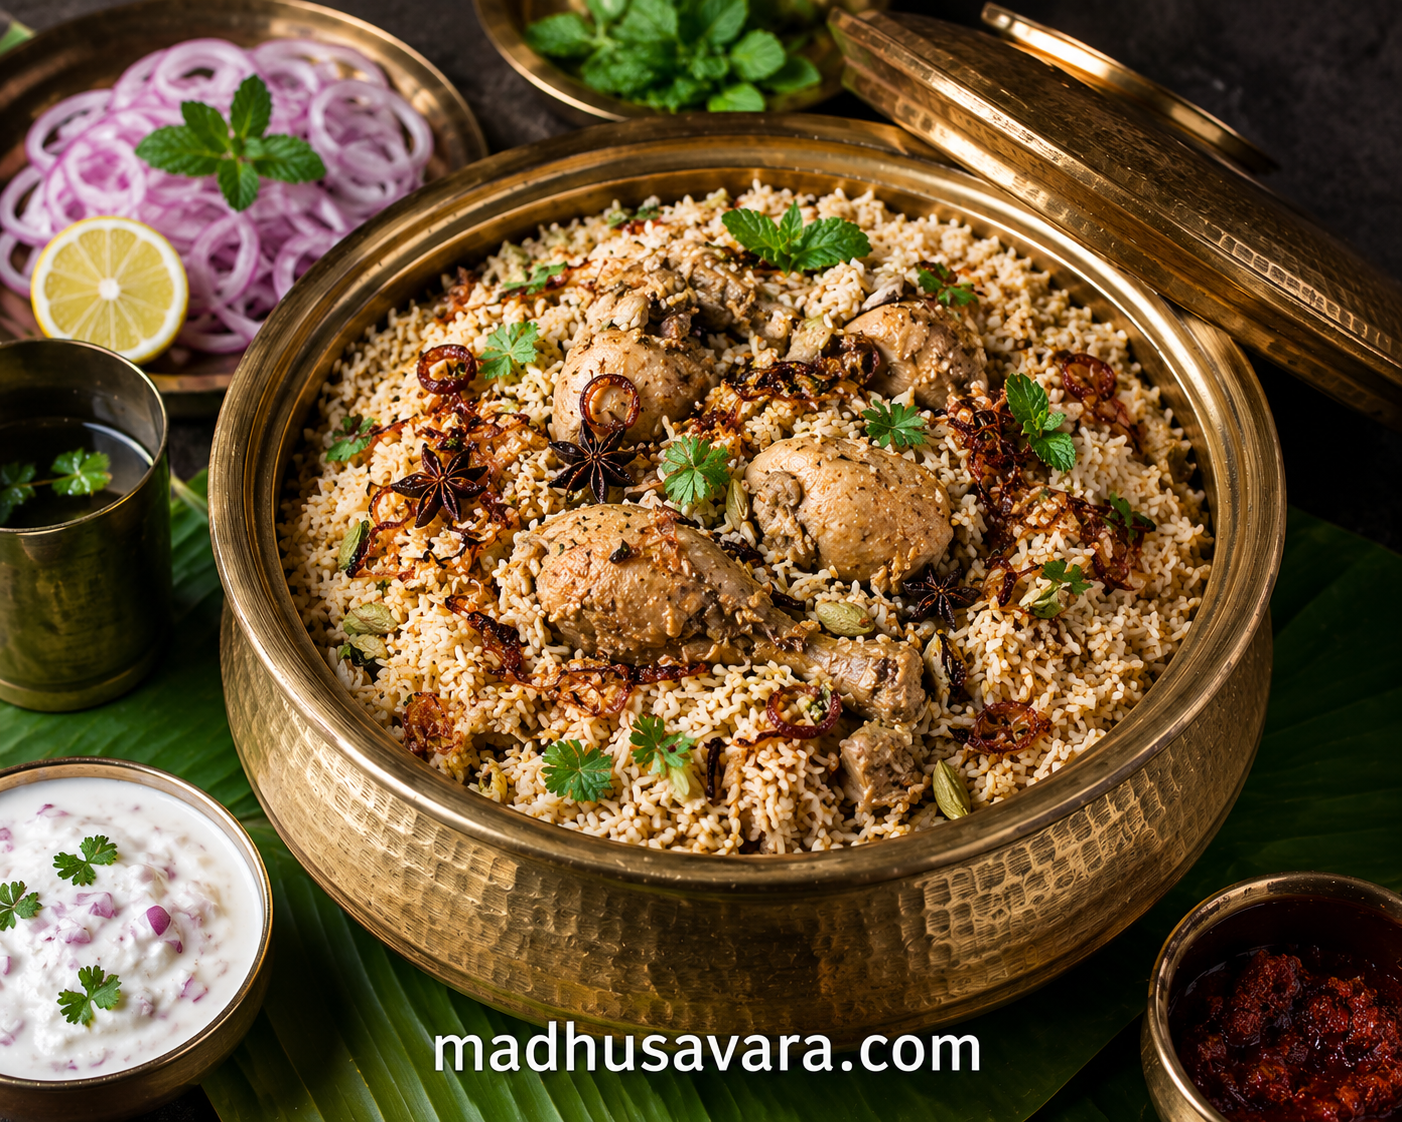
Authentic Beary Biryani served in a traditional brass handi with tender chicken, jeerakasala-style rice, fried onions, fresh herbs, onion raita and Coastal Karnataka accompaniments.

Author’s Note

India’s food culture never ceases to amaze me. Travel a few hundred kilometres, and the same dish tells a completely different story. Biryani is one of the finest examples of this rich diversity. While Hyderabadi, Lucknowi and Kolkata biryanis are known across the country, many regional biryanis continue to be cherished only within the communities that have preserved them for generations.

The Authentic Beary Biryani is one such recipe.

It belongs to the Beary Muslim community of Coastal Karnataka, especially around Mangaluru and the neighbouring districts. This is not a restaurant-style biryani or a modern variation created for commercial appeal. It is a traditional home recipe that has been prepared for generations during weddings, Eid celebrations, family gatherings and other special occasions.

What draws me to this biryani is its simplicity. It doesn’t rely on heavy spices or rich gravies to make an impression. Instead, it uses fragrant rice, fresh herbs, carefully selected spices and the slow dum cooking method to create a meal that is aromatic, comforting and full of flavour. Every ingredient has a role, and every step in the cooking process adds depth to the final dish.

While researching this recipe, I found that many online versions combine Beary Biryani with Malabar or Hyderabadi styles. Although they may appear similar, each has its own history, cooking method and flavour profile. For this recipe, I have stayed as close as possible to the traditional Beary style while making only a few practical adjustments that suit today’s home kitchens without compromising its authenticity.

For me, documenting recipes like this is a way of preserving India’s regional food heritage. Every traditional recipe carries the memories, customs and culinary wisdom of the people who created it. These are the recipes that deserve to be remembered, cooked and shared with future generations.

I hope this Authentic Beary Biryani Recipe encourages you to explore one more beautiful regional cuisine of India and brings the authentic flavours of Coastal Karnataka to your dining table.

Warm regards,

— Madhu Savara

What is Beary Biryani?

Beary Biryani is a traditional chicken biryani from the Beary Muslim community of Coastal Karnataka, especially around Mangaluru. Prepared with chicken, jeerakasala (kaima) rice, fresh herbs and aromatic spices, it is known for its mild, balanced flavours and fragrant aroma. Traditionally served during weddings, Eid celebrations and family gatherings, this Authentic Beary Biryani Recipe remains one of Coastal Karnataka’s most cherished festive dishes.

History and Origin of Beary Biryani

The Traditional Beary Biryani Recipe traces its roots to the Beary Muslim community of Coastal Karnataka. For centuries, Arab traders visited the western coast of India, influencing local trade, culture and cuisine. Over time, Beary families developed their own distinctive style of biryani using jeerakasala (kaima) rice, fresh herbs and carefully balanced spices.

Unlike the royal biryanis of Hyderabad or Lucknow, Beary Biryani evolved in family kitchens and became an integral part of weddings, Eid celebrations and community feasts. Today, it continues to be prepared with pride, preserving a culinary tradition that has been passed down through generations.

Why You’ll Love This Beary Biryani Recipe

  • Authentic recipe from the Beary Muslim community of Coastal Karnataka.
  • Mild, aromatic flavours that let the chicken and rice shine.
  • Traditionally prepared with jeerakasala (kaima) rice for its signature texture and aroma.
  • Perfect for weddings, festivals, family gatherings and weekend meals.
  • Easy-to-follow method suitable for both beginners and experienced home cooks.
  • A wonderful way to experience one of Karnataka’s lesser-known culinary traditions.

Table of Contents

  • What is Beary Biryani?
  • History and Origin of Beary Biryani
  • Why You’ll Love This Beary Biryani Recipe
  • WP Recipe Maker Recipe Card
  • Ingredients
  • Nutritional Value (Per Serving)
  • Equipment Needed
  • How to Make Authentic Beary Biryani (Step-by-Step)
  • Madhu Savara’s Tips
  • Common Mistakes to Avoid
  • Variations
  • What to Serve with Beary Biryani
  • Storage and Reheating Tips
  • Frequently Asked Questions
  • Author’s Bio
  • References

Servings

8 people

Preparation Time:

30 minutes, marination time 1 hour

Cooking Time:

1 Hour 15 Minutes

Calories

610

Ingredients

Ingredients

The beauty of an Authentic Beary Biryani Recipe lies in its simplicity. Unlike many biryanis that depend on a long list of spices, this traditional recipe lets a few fresh ingredients do the real work. Good-quality chicken, fragrant jeerakasala (kaima) rice, thick curd, fresh mint, coriander and whole spices come together to create the mild, aromatic flavour that makes Beary Biryani so special.

If you are preparing this recipe for the first time, try to use jeerakasala (kaima) rice. It is the traditional choice and gives the biryani its characteristic aroma and soft texture. If it is not available, basmati rice can be used, but the taste and texture will not be the same.

For Marinating the Chicken

The yoghurt-based marinade is one of the secrets behind the tender chicken in this Authentic Beary Biryani Recipe. It gently flavours the meat without overpowering the natural taste.

  • 1 kg chicken, cut into medium-sized pieces
  • 1 cup thick curd (yoghurt)
  • 2 tbsp ginger-garlic paste
  • 2 tsp Kashmiri red chilli powder
  • 1 tsp turmeric powder
  • 2 tsp coriander powder
  • 1 tsp garam masala powder
  • Salt to taste
  • Juice of 1 lemon

For Cooking the Rice

For the Biryani Masala

  • 4 large onions, thinly sliced
  • 4 medium tomatoes, finely chopped
  • 8–10 green chillies, slit
  • ½ cup fresh mint leaves
  • ½ cup fresh coriander leaves
  • ¼ cup cooking oil
  • 3 tbsp ghee
  • 1 tsp fennel seeds
  • ½ tsp cumin seeds
  • 2 black cardamom pods
  • 2 blades mace
  • A pinch of freshly grated nutmeg (optional)

For Layering

  • 1 cup fried onions
  • 2 tbsp ghee
  • A handful of mint leaves
  • A handful of coriander leaves
  • A few strands of saffron soaked in 2 tbsp warm milk (optional)

Equipment Needed

  • 1 large mixing bowl – for marinating the chicken
  • Heavy-bottomed biryani pot or Dutch oven – perfect for even dum cooking
  • Large saucepan – to parboil the jeerakasala rice
  • Medium frying pan – for golden fried onions and spices
  • Slotted spoon, measuring cups & spoons, sharp knife, and chopping board

Why a Heavy-Bottom Pot Matters

A heavy-bottom pot distributes heat evenly and prevents the chicken and rice from sticking or burning during dum cooking. If you don’t have a biryani pot, any thick-bottomed pan with a well-fitting lid will work just as well.

Nutrition Information

Nutritional Value (Per Serving)

The nutritional values below are approximate and may vary depending on the quantity of oil, ghee and the size of the chicken pieces used.

Nutrient Approximate Value
Calories 610 kcal
Protein 31 g
Carbohydrates 49 g
Fat 30 g
Saturated Fat 9 g
Cholesterol 115 mg
Dietary Fibre 3 g
Sugar 4 g
Sodium 780 mg
Potassium 520 mg
Calcium 85 mg
Iron 3.2 mg

How Does Beary Biryani Compare with Other Chicken Biryanis?

One of the unique features of the Authentic Beary Biryani Recipe is its balanced use of spices and moderate quantity of oil and ghee. Unlike many restaurant-style chicken biryanis, which are often rich and heavily spiced, Traditional Beary Biryani focuses on the natural flavours of chicken, aromatic jeerakasala (kaima) rice, fresh herbs and whole spices.

Feature Beary Biryani Hyderabadi Biryani Lucknowi (Awadhi) Biryani Malabar Biryani
Rice Used Jeerakasala (Kaima) Basmati Basmati Jeerakasala (Kaima)
Spice Level Mild to Medium Medium to High Mild Mild to Medium
Cooking Style Dum Kacchi or Pakki Dum Pakki Dum Dum
Flavour Profile Mild, aromatic and balanced Rich and spicy Delicate and fragrant Aromatic with subtle spices
Oil & Ghee Moderate Moderate to High Moderate Moderate
Best Served For Weddings, Eid & family feasts Festivals & celebrations Formal meals Family gatherings & festive occasions
Difficulty Level Moderate Moderate to Advanced Moderate Moderate

Step by Step Instructions

How to Make Authentic Beary Biryani (Step-by-Step)

Making an authentic Beary Biryani Recipe is easier than it looks. The secret lies in following each step patiently without rushing the process. Good-quality ingredients, properly cooked rice and gentle dum cooking are the keys to achieving the authentic flavour and aroma.

Step 1: Wash and Soak the Rice

Rinse the jeerakasala (kaima) rice three to four times or until the water runs almost clear. This removes excess starch and helps the grains cook evenly without becoming sticky.

Soak the rice in fresh water for 20 to 30 minutes. Once soaked, drain the water completely and keep the rice aside.

Tip: If you are using basmati rice instead of jeerakasala rice, soak it for about 30 minutes, as the grains take slightly longer to absorb water.

Step 2: Marinate the Chicken

Wash and pat dry the chicken pieces before placing them in a large mixing bowl.

Add the thick curd, ginger-garlic paste, Kashmiri red chilli powder, turmeric powder, coriander powder, garam masala, lemon juice and salt. Mix thoroughly so that every piece of chicken is evenly coated with the marinade.

Cover the bowl and refrigerate for at least 1 hour. If time permits, marinate the chicken for 4 to 6 hours for deeper flavour and more tender meat.

Why this step matters: The yoghurt gently tenderises the chicken, while the spices penetrate the meat during marination, resulting in a more flavourful biryani.

Step 3: Prepare the Fried Onions

Heat the oil and ghee in a heavy-bottomed pan over a medium flame.

Add the thinly sliced onions and cook them slowly, stirring frequently, until they turn an even golden brown. Remove them immediately using a slotted spoon and spread them on a plate. They will continue to darken slightly as they cool.

Reserve a few fried onions for garnishing and use the remaining onions while preparing the masala.

Do not overcook the onions. Dark brown onions can make the biryani slightly bitter, while lightly golden onions add natural sweetness and depth to the masala.

Step 4: Prepare the Beary Biryani Masala

In the same pan, add the fennel seeds, cumin seeds, black cardamom, cloves, cinnamon, star anise and mace. Sauté for about 30 seconds until fragrant.

Add the slit green chillies and chopped tomatoes. Cook until the tomatoes soften and the oil begins to separate.

Now add the marinated chicken along with the entire marinade. Mix well and cook over a medium flame for 20–25 minutes, stirring occasionally, until the chicken is almost cooked and the masala becomes thick.

Finally, stir in the chopped mint and coriander leaves. Taste the masala and adjust the salt if required.

Tip: The masala should be moist enough to coat the rice during dum cooking but should not be watery.

Step 5: Cook the Rice

Bring 3 litres of water to a rolling boil in a large pot. Add the bay leaves, green cardamoms, cloves, cinnamon, star anise, whole black peppercorns and salt.

Add the soaked and drained jeerakasala (kaima) rice and cook over a medium-high flame until it is about 70–80% cooked. The grains should still have a slight bite in the centre.

Drain the rice immediately using a colander and spread it gently on a large tray or plate for a few minutes. This stops the cooking process and keeps the grains separate.

How to check: Press a grain of rice gently between your fingers. It should break easily but still have a tiny firm centre.

Step 6: Layer the Biryani

Keep the chicken masala in the heavy-bottomed biryani pot. If you prepared it in another pan, transfer it now.

Spread half of the partially cooked rice evenly over the chicken masala without pressing it down.

Sprinkle some fried onions, chopped mint, chopped coriander and a little ghee over the rice.

Add the remaining rice and finish with the rest of the fried onions, mint, coriander and ghee. If using saffron milk, drizzle it evenly over the top layer.

Tip: Avoid mixing the rice and masala at this stage. Separate layers give the biryani its beautiful appearance and allow the flavours to blend gradually during dum cooking.

Step 7: Dum Cooking

Cover the pot with a tight-fitting lid. If the lid is loose, seal the edges with wheat flour dough or aluminium foil to prevent the steam from escaping.

Cook on a low flame for 25–30 minutes. If your pan has a thin base, place a heavy tawa underneath to prevent the bottom layer from burning.

Switch off the heat and allow the biryani to rest for 10–15 minutes without opening the lid. This resting time allows the steam to settle and the flavours to develop fully.

Do not lift the lid during dum cooking. Opening the pot releases the trapped steam and affects both the texture and aroma of the biryani.

Step 8: Serve the Beary Biryani

Open the lid gently and fluff the rice with a long fork or a flat spoon, lifting it from the sides without breaking the grains.

Serve the Authentic Beary Biryani hot with onion raita, salan, pickle, boiled eggs or papad. Garnish with extra fried onions, fresh coriander and mint leaves, if desired.

Every spoonful should have a little rice, chicken and masala, giving you the authentic flavour and aroma that make this traditional Beary Biryani Recipe so special.

Tips and Variations

Madhu Savara’s Tips

After preparing this Authentic Beary Biryani Recipe a few times and studying the traditional method, here are a few tips that will help you get the best results every time.

  • Use jeerakasala (kaima) rice whenever possible. It gives the biryani its authentic aroma and texture.
  • Don’t skip the marination. Marinating the chicken for at least an hour keeps it juicy and flavourful.
  • Cook the rice only up to 70–80%. The remaining cooking happens during dum. Fully cooked rice may become mushy.
  • Fry the onions patiently. Evenly golden onions add sweetness and depth to the masala. Avoid over-browning them.
  • Keep the masala thick, not watery. Excess liquid can make the rice sticky during dum cooking.
  • Seal the pot properly. Trapped steam is essential for developing the aroma and flavour.
  • Rest the biryani before serving. Let it stand for 10–15 minutes after dum. This helps the rice absorb the remaining moisture and makes serving easier.
  • Fluff, don’t stir. Use a flat spoon to lift the rice gently from the sides so the grains remain separate.

Variations

Although the Traditional Beary Biryani Recipe is prepared with chicken, you can adapt it to suit your family’s preferences without changing its basic cooking style.

Mutton Beary Biryani

Replace the chicken with mutton. Marinate it in the same way, but cook the meat until it is almost tender before layering it with the rice. Mutton requires a longer cooking time than chicken.

Beary Egg Biryani

Use boiled eggs instead of chicken for a simple yet satisfying version. Lightly fry the boiled eggs with a pinch of turmeric, chilli powder and salt before adding them to the masala.

Spicier Beary Biryani

Traditional Beary Biryani is mildly spiced. If you enjoy a little more heat, add 2–3 extra green chillies or increase the Kashmiri red chilli powder slightly without overpowering the dish.

Spicier Beary Biryani

For weddings and festive occasions, some families garnish the biryani with fried cashew nuts, raisins and a little extra ghee. These additions are optional but make the biryani richer and more festive.

Basmati Rice Variation

If jeerakasala (kaima) rice is unavailable, good-quality basmati rice can be used. The biryani will still be delicious, although the aroma and texture will differ from the traditional Beary version.

Allergen Information

Allergen Information

This Authentic Beary Biryani Recipe may contain the following allergens:

Allergen Present Notes
Milk (Dairy) ✅ Yes Curd (yoghurt), ghee and optional saffron milk.
Tree Nuts ⚠️ Possible Some traditional recipes include cashew nuts for garnish. Omit if required.
Gluten ❌ No* Naturally gluten-free when prepared with pure spices and ingredients free from gluten contamination.
Eggs ❌ No Not included in this recipe. Boiled eggs are optional while serving.
Soy ❌ No Not used in the traditional recipe.
Peanuts ❌ No Not included.
Sesame ❌ No Not included.
Fish & Shellfish ❌ No Not included.

Note: Always check the labels on packaged spices, curd and other ingredients if cooking for someone with food allergies, as manufacturing practices may vary.

Other Essentials

Common Mistakes to Avoid While Making Beary Biryani

  • Do not overcook the rice: Cook the rice only 70–80% before dum cooking to keep the grains separate.
  • Do not skip marination: Proper marination makes the chicken tender and flavourful.
  • Avoid watery masala: The chicken masala should be thick; excess moisture can make the biryani soggy.
  • Do not burn the onions: Golden brown fried onions add sweetness, while burnt onions can make the biryani bitter.
  • Avoid too many spices: Biryani is known for its balanced and subtle flavours.
  • Do not open the lid during dum: Let the steam work naturally for the best aroma and texture.
  • Allow resting time: Rest the biryani for 10–15 minutes before serving for better flavour.

Storage and Reheating Tips

Storage:

  • Allow the biryani to cool completely before storing.
  • Store in an airtight container in the refrigerator for up to 2 days.
  • For longer storage, you can freeze it in portion-sized containers for up to 1 month.

Reheating:

  • Best Method: Reheat in a pan on low flame with a sprinkle of water or a little ghee. Cover and steam gently until hot.
  • Microwave: Sprinkle 1–2 teaspoons of water, cover with a damp paper towel and heat in short intervals, stirring gently in between.
  • From Frozen: Thaw overnight in the refrigerator, then reheat using the stovetop method for best texture.

Tip: The flavour of Beary Biryani actually improves the next day as the spices settle. Many families say it tastes even better on the second day!

Frequently Asked Questions (FAQs)

1. What is Beary Biryani?

Beary Biryani is a traditional chicken biryani prepared by the Beary Muslim community of Coastal Karnataka, especially around Mangaluru. It is known for its mild spices, fragrant rice, fresh herbs and balanced flavours.

2. What rice is traditionally used for Beary Biryani?

Authentic Beary Biryani Recipe uses jeerakasala (kaima) rice, a short-grain aromatic rice popular in the coastal regions of South India. It absorbs the masala beautifully and gives the biryani its traditional texture and aroma.

3. Can I use basmati rice instead of jeerakasala rice?

Yes, basmati rice can be used if jeerakasala rice is not available. However, the flavour and texture will be slightly different from the traditional Coastal Karnataka style.

4. Is Beary Biryani spicy?

No. Traditional Beary Biryani is not extremely spicy. It is appreciated for its gentle aroma and balanced flavours rather than strong heat.

5. How long should I marinate the chicken?

For the best flavour, marinate the chicken for at least 1 hour. If you have more time, keeping it for 4–6 hours gives even better results.

6. Can I make Beary Biryani with mutton?

Yes, mutton can be used instead of chicken. Since mutton takes longer to cook, cook it until tender before layering with rice.

7. Why is my biryani rice becoming sticky?

Sticky rice usually happens because of overcooking the rice before dum or adding excess liquid to the masala. Always cook the rice only up to 70–80%.

8. Can I prepare Beary Biryani in advance?

Yes, you can prepare it a few hours before serving. Many biryanis develop better flavour after resting. Reheat gently before serving.

9. How long can leftover Beary Biryani be stored?

Store leftover biryani in an airtight container in the refrigerator and consume within 2 days. For longer storage, it can be frozen.

10. What makes Beary Biryani different from Malabar or Hyderabadi Biryani?

Every biryani has its own regional identity. Beary Biryani stands out because of its use of jeerakasala rice, mild seasoning and the traditional cooking style of the Beary community of Coastal Karnataka.

11. Can I make Beary Biryani without saffron?

Yes. Saffron is optional and mainly adds colour and aroma. The authentic flavour of the biryani comes from the rice, chicken, herbs and spices.

12. What are the best side dishes for Beary Biryani?

Beary Biryani is usually enjoyed with onion raita, salad, pickle, papad and sometimes a simple gravy or curry.

13. Can I cook Beary Biryani in a pressure cooker?

Yes, but the traditional dum method gives the best texture and aroma. If using a pressure cooker, carefully control the water quantity and cooking time to avoid overcooking the rice.

14. Why is resting the biryani important?

Resting allows the steam to settle and helps the flavours blend. It also makes the rice grains firmer and easier to serve.

15. Is Beary Biryani a traditional festive dish?

Yes. It is commonly prepared during weddings, Eid celebrations, family gatherings and special occasions among the Beary Muslim community.

Final Thoughts

The Authentic Beary Biryani Recipe is much more than a delicious chicken biryani. It is a celebration of the rich culinary heritage of the Beary Muslim community, lovingly preserved through generations in the homes of Coastal Karnataka. Every layer of fragrant jeerakasala (kaima) rice, tender chicken, fresh herbs and aromatic spices tells a story of tradition, family and timeless cooking.

What makes this traditional Beary Biryani truly special is its simplicity. Instead of relying on heavy spices or rich gravies, it lets fresh ingredients and the slow dum cooking method create flavours that are delicate, comforting and unforgettable. It is the kind of biryani that reminds us that some of India’s greatest culinary treasures are found not in royal kitchens or famous restaurants, but in family recipes carefully passed down over the years.

I hope this Authentic Beary Biryani Recipe inspires you to bring a taste of Coastal Karnataka into your own kitchen. Cook it for your family, share it with friends, and enjoy not just a wonderful meal but a beautiful tradition that continues to keep India’s diverse food heritage alive.

Call to Action

If you tried this Beary Biryani Recipe, I would love to hear about your experience. Share your feedback, cooking tips or family variations in the comments.

Your stories help preserve India’s traditional recipes and inspire more food lovers to discover the rich regional cuisines of our country.

Don’t forget to share this recipe with family and friends who enjoy exploring authentic Indian food traditions.

Author’s Bio

Madhu Savara is a food blogger and passionate explorer of India’s regional cuisines. Through madhusavara.com, she documents authentic recipes, traditional cooking methods and forgotten food traditions from different parts of India.

Her work focuses on preserving the stories behind recipes — from Himalayan cuisine to regional specialities like traditional biryanis — and making them accessible for home cooks who value authentic flavours and cultural heritage.

References

 Karnataka Tourism – Cuisine of Karnataka (Government of Karnataka)
This source provides background about the Beary (Byari) community of Coastal Karnataka, their historical links with trade communities, and their distinctive culinary traditions.

Aditi Prabhu – “Beary Biryani: Forgotten Delicacy of Karnataka”
A food documentation article specifically covering Beary Biryani, including its association with the Beary community, ingredients, and traditional preparation method.

Karnataka Beary Sahitya Academy Publications
Publications related to Beary language and cultural heritage provide authentic community-level documentation useful for understanding Beary identity and traditions.

The Authentic Beary Biryani Recipe shared here has been researched from available cultural and culinary references. Since Beary Biryani is a traditional community recipe, preparation methods may vary between families and regions of Coastal Karnataka. This recipe respects the traditional identity of Beary cuisine while adapting the method for a modern home kitchen.


Disclaimer

Important Notice: Read Before Proceeding

The recipes, preparation methods, nutritional details, and related content published on Madhu Savara’s website, social media, and associated platforms are intended solely for general informational and educational purposes. While every effort has been made to ensure accuracy and reliability, we make no guarantees regarding the results, safety, or accuracy of any recipe presented here.

We are not licensed nutritionists, dieticians, or medical professionals. The nutritional values provided are estimates only, calculated using third-party tools, and should not be used for medical diagnosis, dietary treatment, or allergy management. If you have any medical conditions, dietary restrictions, or food allergies, please consult your doctor or certified dietitian before attempting any recipe.

Cooking inherently involves sharp tools, high heat, and the risk of injury or fire. You assume full responsibility for your kitchen practices. Madhu Savara, the website, and all contributors shall not be held liable for any damage, injury, loss, or adverse outcome resulting directly or indirectly from the preparation, consumption, or interpretation of any content herein.

By using this website and attempting any recipe, you agree to hold harmless and indemnify Madhu Savara and her team from any liability, legal claim, or damages arising from the use of this content. You are encouraged to exercise independent judgment and take full responsibility for your health, kitchen safety, and actions.


Authentic Beary Biryani served in a traditional brass handi with tender chicken, jeerakasala-style rice, fried onions, fresh herbs, onion raita and Coastal Karnataka accompaniments.
Print

Authentic Beary Biryani Recipe | Traditional Coastal Karnataka Chicken Biryani

Beary Biryani is a traditional chicken biryani from the Beary Muslim community of Coastal Karnataka, especially around Mangaluru. Prepared with chicken, jeerakasala (kaima) rice, fresh herbs and aromatic spices, it is known for its mild, balanced flavours and fragrant aroma. Traditionally served during weddings, Eid celebrations and family gatherings, this Authentic Beary Biryani Recipe remains one of Coastal Karnataka’s most cherished festive dishes.
Course Main Course
Cuisine Coastal Karnataka, Beary Cuisine, South Indian
Keyword Authentic Beary Biryani Recipe
Prep Time 30 minutes
Cook Time 1 hour 15 minutes
Marination time 1 hour 15 minutes
Total Time 3 hours
Servings 8 People
Calories 610kcal
Author Madhu Savara

Ingredients

  • 1 kg chicken cut into medium-sized pieces
  • 1 cup thick curd yoghurt
  • 2 tbsp ginger-garlic paste
  • 2 tsp Kashmiri red chilli powder
  • 1 tsp turmeric powder
  • 2 tsp coriander powder
  • 1 tsp garam masala powder
  • Salt to taste
  • Juice of 1 lemon
  • For Cooking the Rice
  • 750 g jeerakasala kaima rice
  • 3 litres water
  • 2 bay leaves
  • 5 green cardamoms
  • 5 cloves
  • 2- inch cinnamon stick
  • 1 star anise
  • 1 tsp whole black peppercorns
  • Salt to taste
  • For the Biryani Masala
  • 4 large onions thinly sliced
  • 4 medium tomatoes finely chopped
  • 8 –10 green chillies slit
  • ½ cup fresh mint leaves
  • ½ cup fresh coriander leaves
  • ¼ cup cooking oil
  • 3 tbsp ghee
  • 1 tsp fennel seeds
  • ½ tsp cumin seeds
  • 2 black cardamoms
  • 2 blades mace
  • A pinch of freshly grated nutmeg optional
  • For Layering
  • 1 cup fried onions
  • 2 tbsp ghee
  • A handful of mint leaves
  • A handful of coriander leaves
  • A few strands of saffron soaked in 2 tbsp warm milk optional

Instructions

  • How to Make Authentic Beary Biryani (Step-by-Step)
  • Making an authentic Beary Biryani Recipe is easier than it looks. The secret lies in following each step patiently without rushing the process. Good-quality ingredients, properly cooked rice and gentle dum cooking are the keys to achieving the authentic flavour and aroma.
  • Step 1: Wash and Soak the Rice
  • Rinse the jeerakasala (kaima) rice three to four times or until the water runs almost clear. This removes excess starch and helps the grains cook evenly without becoming sticky.
  • Soak the rice in fresh water for 20 to 30 minutes. Once soaked, drain the water completely and keep the rice aside.
  • Tip: If you are using basmati rice instead of jeerakasala rice, soak it for about 30 minutes, as the grains take slightly longer to absorb water.
  • Step 2: Marinate the Chicken
  • Wash and pat dry the chicken pieces before placing them in a large mixing bowl.
  • Add the thick curd, ginger-garlic paste, Kashmiri red chilli powder, turmeric powder, coriander powder, garam masala, lemon juice and salt. Mix thoroughly so that every piece of chicken is evenly coated with the marinade.
  • Cover the bowl and refrigerate for at least 1 hour. If time permits, marinate the chicken for 4 to 6 hours for deeper flavour and more tender meat.
  • Why this step matters: The yoghurt gently tenderises the chicken, while the spices penetrate the meat during marination, resulting in a more flavourful biryani.
  • Step 3: Prepare the Fried Onions
  • Heat the oil and ghee in a heavy-bottomed pan over a medium flame.
  • Add the thinly sliced onions and cook them slowly, stirring frequently, until they turn an even golden brown. Remove them immediately using a slotted spoon and spread them on a plate. They will continue to darken slightly as they cool.
  • Reserve a few fried onions for garnishing and use the remaining onions while preparing the masala.
  • Do not overcook the onions. Dark brown onions can make the biryani slightly bitter, while lightly golden onions add natural sweetness and depth to the masala.
  • Step 4: Prepare the Beary Biryani Masala
  • In the same pan, add the fennel seeds, cumin seeds, black cardamoms, cloves, cinnamon, star anise and mace. Sauté for about 30 seconds until fragrant.
  • Add the slit green chillies and chopped tomatoes. Cook until the tomatoes soften and the oil begins to separate.
  • Now add the marinated chicken along with the entire marinade. Mix well and cook over a medium flame for 20–25 minutes, stirring occasionally, until the chicken is almost cooked and the masala becomes thick.
  • Finally, stir in the chopped mint and coriander leaves. Taste the masala and adjust the salt if required.
  • Tip: The masala should be moist enough to coat the rice during dum cooking but should not be watery.
  • Step 5: Cook the Rice
  • Bring 3 litres of water to a rolling boil in a large pot. Add the bay leaves, green cardamoms, cloves, cinnamon, star anise, whole black peppercorns and salt.
  • Add the soaked and drained jeerakasala (kaima) rice and cook over a medium-high flame until it is about 70–80% cooked. The grains should still have a slight bite in the centre.
  • Drain the rice immediately using a colander and spread it gently on a large tray or plate for a few minutes. This stops the cooking process and keeps the grains separate.
  • How to check: Press a grain of rice gently between your fingers. It should break easily but still have a tiny firm centre.
  • Step 6: Layer the Biryani
  • Keep the chicken masala in the heavy-bottomed biryani pot. If you prepared it in another pan, transfer it now.
  • Spread half of the partially cooked rice evenly over the chicken masala without pressing it down.
  • Sprinkle some fried onions, chopped mint, chopped coriander and a little ghee over the rice.
  • Add the remaining rice and finish with the rest of the fried onions, mint, coriander and ghee. If using saffron milk, drizzle it evenly over the top layer.
  • Tip: Avoid mixing the rice and masala at this stage. Separate layers give the biryani its beautiful appearance and allow the flavours to blend gradually during dum cooking.
  • Step 7: Dum Cooking
  • Cover the pot with a tight-fitting lid. If the lid is loose, seal the edges with wheat flour dough or aluminium foil to prevent the steam from escaping.
  • Cook on a low flame for 25–30 minutes. If your pan has a thin base, place a heavy tawa underneath to prevent the bottom layer from burning.
  • Switch off the heat and allow the biryani to rest for 10–15 minutes without opening the lid. This resting time allows the steam to settle and the flavours to develop fully.
  • Do not lift the lid during dum cooking. Opening the pot releases the trapped steam and affects both the texture and aroma of the biryani.
  • Step 8: Serve the Beary Biryani
  • Open the lid gently and fluff the rice with a long fork or a flat spoon, lifting it from the sides without breaking the grains.
  • Serve the Authentic Beary Biryani hot with onion raita, salan, pickle, boiled eggs or papad. Garnish with extra fried onions, fresh coriander and mint leaves, if desired.
  • Every spoonful should have a little rice, chicken and masala, giving you the authentic flavour and aroma that make this traditional Beary Biryani Recipe so special.

Notes

Tips and Variations
 

Madhu Savara’s Tips

After preparing this Authentic Beary Biryani Recipe a few times and studying the traditional method, here are a few tips that will help you get the best results every time.
  • Use jeerakasala (kaima) rice whenever possible. It gives the biryani its authentic aroma and texture.
  • Don’t skip the marination. Marinating the chicken for at least an hour keeps it juicy and flavourful.
  • Cook the rice only up to 70–80%. The remaining cooking happens during dum. Fully cooked rice may become mushy.
  • Fry the onions patiently. Evenly golden onions add sweetness and depth to the masala. Avoid over-browning them.
  • Keep the masala thick, not watery. Excess liquid can make the rice sticky during dum cooking.
  • Seal the pot properly. Trapped steam is essential for developing the aroma and flavour.
  • Rest the biryani before serving. Let it stand for 10–15 minutes after dum. This helps the rice absorb the remaining moisture and makes serving easier.
  • Fluff, don’t stir. Use a flat spoon to lift the rice gently from the sides so the grains remain separate.

Variations

Although the Traditional Beary Biryani Recipe is prepared with chicken, you can adapt it to suit your family’s preferences without changing its basic cooking style.

Mutton Beary Biryani

Replace the chicken with mutton. Marinate it in the same way, but cook the meat until it is almost tender before layering it with the rice. Mutton requires a longer cooking time than chicken.

Beary Egg Biryani

Use boiled eggs instead of chicken for a simple yet satisfying version. Lightly fry the boiled eggs with a pinch of turmeric, chilli powder and salt before adding them to the masala.

Spicier Beary Biryani

Traditional Beary Biryani is mildly spiced. If you enjoy a little more heat, add 2–3 extra green chillies or increase the Kashmiri red chilli powder slightly without overpowering the dish.
Spicier Beary Biryani
For weddings and festive occasions, some families garnish the biryani with fried cashew nuts, raisins and a little extra ghee. These additions are optional but make the biryani richer and more festive.

Basmati Rice Variation

If jeerakasala (kaima) rice is unavailable, good-quality basmati rice can be used. The biryani will still be delicious, although the aroma and texture will differ from the traditional Beary version.